Sunday, December 19, 2010

The Quintessential Christmas Cake

How does something become a holiday tradition? I don't remember when I discovered red velvet cake. It may well be I had never tasted one before I baked my first.  I honestly can't remember!  But I do know I have baked them for so many Christmases now it would seem downright bah hum bug to skip a year.  If asked to pick a favorite cake (which would be like choosing a favorite child) I would certainly list red velvet as a top contender. The cream cheese frosting is of course a contributing factor since in my humble opinion frosted shoe leather could be quite appetizing if smeared with a bit of the heavenly stuff.  But it truly has much to do with the cake itself.  A successful red velvet cake lives up to its name with a silky texture, a fine crumb that clings together, plentifully moist so that a knife glides smoothly through the cake to make each slice.  This cake is not cloyingly sweet nor is it overly chocolate even though cocoa contributes both taste and color.  I have wondered how I would describe the taste if blindfolded.  Would I distinguish it as chocolate or would I just detect an undefined richness?

The recipe I offer you today is tried and true and has never failed me.  It hails from my Dixie Delights cookbook, published in 1983 by the St. Francis Hospital Auxiliary in Memphis, Tennessee, a gift from my mother after a visit to my sister when she lived there in 1984.  This cookbook has been around the block a few times and is one of my go-to-sources for good Southern sweets and desserts.  The red velvet cake is a perfect example of why I use this cookbook so consistently. The layers bake marvelously flat, are easily released from the pans after only slight cooling and frost beautifully.  I can pretty much guarantee you a cake that is a double threat--baked up with both great taste and festive presentation.  I sacrificed much this weekend to bake a cake for the sole purpose of photographing the process.  I guess now we'll just have to consume this one quickly so I can bake a fresh one for Christmas Day!  Somehow as I cut into the cake just a few hours ago, it didn't feel like much of a sacrifice.  It felt rather as if the Christmas season had arrived!

Red Velvet Cake
1-1/2 cups sugar
2 cups oil
2 eggs
1 teaspoon soda
1 teaspoon salt
1 teaspoon vinegar
1 tablespoon cocoa
2 ounces food coloring
1 tablespoon vanilla
2-1/2 cups sifted flour
1 cup buttermilk


1.  Preheat the oven to 350 degrees.  (I use an oven thermometer to check my temperature. My oven is 25 degrees hotter than the setting.  That much variation can effect your results.)

2.  Cut wax paper to fit three 9 inch cake pans.  Grease the pans with a bit of oil or cooking spray and place the wax paper on the bottom of each pan.

3.  Cream sugar and oil together with a hand mixer or in a stand mixer.

4.  Add eggs one at a time, beating after each addition.

5.  Add soda, salt, vinegar, cocoa, food coloring and vanilla.  Mix well.  The vinegar will react with the eggs and begin to thicken the mixture.  Don't be alarmed when this happens.

6.  Add the flour and buttermilk alternately in several additions, beginning and ending with the flour.

7.  Divide the batter evenly among the pans.

8.  Bake about twenty minutes until a tester inserted into the middle of the layer comes out clean.  Note that the layers may not all finish at the same time.  When I baked this cake, two layers finished at the same time and the other required another couple of minutes.

9.  Cool slightly on a rack.

10.  Flip layers out of the pans, remove the wax paper and allow to cool completely before frosting with cream cheese frosting.  A note about this stage of cooling: nudge the layers around on the rack from time to time while cooling.  Sometimes the rack will imbed itself in the cake and you'll end up with crumbs when the layer pulls away from the rack.  A gentle nudge to change the layer's position will help with this.


Cream Cheese Frosting
8 ounces cream cheese
1 stick or 1/2 cup butter
1 pound confectioner's sugar
1 tablespoon vanilla

1.  Allow cream cheese and butter to soften to room temperature.  Mix together.

2.  Add sugar a little at a time until blended into cream cheese mixture.

3.  Add vanilla and mix well.

Frosting tip:  Don't scrimp on frosting between layers and use an offset spatula to spread frosting from the middle out.  You don't want to pick up red crumbs and mix in with the frosting.  If this should happen, stay cool!  We can fix this!  Finish frosting the entire cake.  Hold back a little of your frosting and leave it at room temperature. Refrigerate the frosted cake.  When it has cooled and the frosting is set, take the cake out and spread the reserved frosting over the places where the crumbs got mixed in. Voila!  No one will ever know.

Tips on making cupcakes: This recipe will make about 21-24 cupcakes, depending upon how much you fill the cups. Use cupcake liners and fill a generous 3/4 of the way. The baking time will be about the same as for the layers, 20 minutes at 350 degrees.


About red food coloring:  This stuff will stain so be careful.  One year I popped open a bottle of the food coloring with too much vigor and it spilled all over me and down the front of my white cabinets.  I had to use bleach to clean the cabinets and the Nike swoosh on my black warm up pants is red to this day.

Friday, December 17, 2010

Cold Nights

Unfortunately, I lost November.  For that matter, the first two weeks of December sprinted by as well, leaving me with my mouth agape wondering where time has gone.  Can you misplace 6 weeks?  I may sound as if I haven't been fully present, as if I have been holed up in a cave or otherwise dubiously preoccupied--but that would be an overstatement.  In fact this month and a half has just been so jam-packed I have tended to let non essentials slide.

November and December actually looked like this:  My road warrior husband graciously allowed me to tag along with him on business trips to the Georgia coast.  I road-tripped to numerous Auburn football games including the arctic blast that was this year's Iron Bowl and the exhilaration of the SEC championship game.  I spent time in Atlanta with family for Thanksgiving.  I brought my mom back to Fairhope (by way of Jekyll Island) for a week spent sipping warm beverages and hoping Paul didn't notice we were slowly inching the thermostat higher and higher.

When last I checked it was the transitional season I love most, autumn (unless you ask me in March or April and then my favorite is definitely spring.)  But then I blinked and we were slap dab in the middle of what I would swear is winter.  I would never thrive in a really wintry climate.  When the mercury creeps down toward the freezing point, I pull out the gloves and scarves and my pillowy winter coat.  I connect the heated mattress pad and fire up a strategically placed space heater.  Paul survives in the steamy microclimate I create by stripping down to his scivvies and stepping outside periodically to breath.

But the good thing about cold weather is the opportunity it presents  to cook cold weather food.  Oh yes, just as surely as we put away our white shoes and patent leather after Labor Day and pull out our corduroy and woolens, there are some foods that can ONLY be enjoyed after the leaves have turned and the air has a decided chill.  Would you eat a steaming bowl of chili in late July?  Absolutely not!  Likewise, a hearty stick-to-your-ribs meal of braised short ribs is something I tend to gravitate toward as the days have gotten shorter and sweaters and turtle necks begin to make a regular appearance.

This recipe for braised short ribs is now one of my favorite ways to eat beef.  Although not nearly as simple to prepare as throwing a steak on the grill, a meal cooked in a big pot in a slow oven has its own charms.  The aroma drifting through your house if leaked beyond your walls may just bring a casual passerby inside to see if you would be willing to set another place at the table.  It is so versatile it can be served peasant style with a rustic baguette and a simple salad or it can be dressed up with some creamy polenta and roasted vegetables.  When all gussied up it becomes a great do-ahead meal for guests.  And again, when you open the door to invite folks inside, they will feel oh-so welcome and may well never leave.  Last February I put short ribs in the oven while we walked up the street for a Mardi Gras parade.  When we came home, the house smelled like heaven and dinner was ready.  You can't really beat that on a cold winter night!

Braised Short Ribs
6 or so bone-in short ribs, about 6 pounds
kosher salt
extra virgin olive oil
2 cloves garlic
2 ribs celery
2 carrots
1 large onion
2 6-ounce cans tomato paste
1 bottle red wine (the kind you would drink)
1-2 cups water
1 bunch fresh thyme, tied with kitchen string
2 bay leaves


1.  Preheat the oven to 375 degrees.

2.  Pull out your big dutch oven for this.  Coat the pan with olive oil and bring to high heat.  Season the ribs generously with salt and pepper and brown on all sides. Don't overcrowd the pan or you won't get a nice sear on each side.  You may want to work in batches.

3.  While the ribs are browning, cut the vegetables in chunks and smash the garlic.  Process together in a food processor until it forms a coarse paste.

4.  Remove the ribs from the pan and add more olive oil to the same pan.  Add the pureed vegetables.  Season generously with salt.  Allow the vegetables to brown until they are dark and crusty on the bottom, but not burned.  Continue to turn and allow to become crusty again several times.  This will take about 7-10 minutes.  Mix in the tomato paste and allow the mixture to brown again, about 5 minutes.  Add the wine and scrape the pan.  Lower the heat and reduce the mixture by about half.

5.  Return the short ribs to the pan and add water until the ribs are covered. Add the thyme bundle and the bay leaves.  Cover the pan and place in the preheated oven for about 3 hours.  Check periodically during the process and add more water, if needed.  Turn the ribs over halfway through the cooking time.

6.  Remove the lid during the last 20 minutes of cooking to let the ribs get nice and brown and to allow the sauce to reduce.  When done the meat should be quite tender but not falling off the bone. (Although much worse things could happen!)

7.  Serve with the braising liquid.  These could be served with mashed potatoes or pasta. A nice creamy polenta with a little cheese added is probably my favorite, especially when the polenta and the sauce get really chummy with each other!

Saturday, October 30, 2010

Mellow Mornings

Not every morning can be mellow.  The rapid-fire pace of life demands that most days' nourishment (and I use that term lightly) begins with something perfunctory, scarfed from a package or slurped quickly from a bowl. I am of the opinion that a good breakfast, the kind you share with others on a weekend or holiday, presents some of life's finest moments.  The breakfast table is one of my happy places!

I grew up with leisurely Saturday morning breakfasts, catered mid-morning to a houseful of late sleepers.   My mom to this day makes magic biscuits and has this skillet wonder dish she calls German Farmer's Breakfast, a melange of potatoes, onions, peppers and whatever scrambled into eggs in a sort of loose frittata.  And she can take an earnest package of dried beef and turn it into a gravy that is to die for.  Really!  But more important has been the time around the table, the connecting, the catching up, the idle conversation over cleaned plates that makes the morning happy.  The food, ah the food, is a most lovely catalyst that calls folks to lounge and linger.  Many weekends as I was growing up, the Lambert house resembled a loud and happy boarding house or gregarious bed and breakfast as relatives and friends found an extra bed or pull-out sofa at the ready on Friday nights, and groggily found their way to the kitchen table as the smell of hot biscuits and fresh-brewed coffee began to nudge them gently to wakefulness on Saturday morning.

This is a tradition I felt obliged to carry over to my own family.  When I married Paul and the boys, I found breakfast to be the one meal where I could please everyone's palate. I was a novice at feeding young boys and I cooked a lot things that missed the mark.  I could tell by the ring of detritus around the edge of the plates as I cleaned the dishes, little pieces of mushroom or onion or celery or other ingredients deemed either unidentifiable or undesirable by discerning boys.  Pancakes worked 100% of the time. Bacon was always a hit. I hope now as they are older they understand food is one of the ways I have tried to show them love over the years, even though some of the attempts were questionable!

As Paul and I have become empty nesters, sharing a leisurely Saturday breakfast continues to be something we gravitate toward, a cozy respite after scattered days and schedules.  And given the chance when visiting friends' homes I will volunteer to make breakfast as a sort of reverse gift of hospitality (they supply their home, I love them with breakfast!)

We have lovely friends who have allowed us to make ourselves at home at their lake house for Auburn football weekends.  They share so generously of their home and their friendship.  Last weekend as we settled in with them on Friday night in preparation for an epic Auburn football battle with LSU, I came prepared with Saturday breakfast. Likewise, as the holidays are fast approaching (oh, yes, faster than we can imagine) many of us will be opening our homes to friends and relatives or finding ourselves camped out on extra beds and pull-out sofas as we become the guests.  Nothing says love like yeasty homemade cinnamon rolls.  The smell announces good tidings way before the first roll is shared.  With just a little bit of advance preparation (okay, maybe a MODERATE amount of advance preparation) you can create an environment where lounging and lingering are de rigueur.

Once again my faithful recipe hound (husband Paul) found this recipe for me and it's been tucked away in a folder awaiting the right opportunity.  Clipped from the Atlanta Journal Constitution who-knows-when, this recipe teased us with a picture of a baking sheet crammed full of cinnamon rolls the size of baseball mitts--think catcher's glove size!  I have experimented with the recipe and made all the mistakes FOR you ahead of time here in my humble test kitchen and can guide you step by step through what you need to know to prepare these and freeze them in advance.  And if you are a newbie to yeast breads I encourage you to be of good cheer and overcome your fear.  Yeast doughs are amazingly resilient and forgiving.  It is not nearly as easy to mess up as you may think.  And nothing is quite as therapeutic and cathartic as having your hands in dough.  Give this recipe a try and a lovely mellow morning is sure to follow.

GIANT CINNAMON ROLLS
Adapted from a recipe provided by Deb Rapp to the AJC food section.  I halved the original recipe and made 12 rolls.  You can double this for a big batch that makes two dozen.


Dough:
1 package yeast (or 2-1/4 tsp.)
1/2 cup plus 1 TB. sugar, divided
3/4 cup warm water, divided
1/4 cup (1/2 stick) butter, room temperature
1/2 cup milk
1 egg
1 tsp. salt
3 to 3-1/2 cups bread flour
1 cup whole wheat flour (optional, you may use all bread flour)

Filling:
3/4 cup packed light brown sugar
1/4 cup all purpose flour
2 TBS. cinnamon
1/2 cup (1 stick) butter, room temperature

Frosting:
1 cup confectioners' sugar
3 oz. cream cheese, room temperature
1/4 cup (1/2 stick) butter, room temperature
1 TBS. milk
1 tsp. vanilla

To make the dough:
1.  Dissolve yeast and 1 TBS. sugar in 1/4 cup warm water.
2.  Mix together the flours.
3.  Place 1/4 cup butter and 1/2 cup sugar in a large bowl, or in the bowl of a stand mixer.  Scald milk and pour over the butter and sugar.  Stir by hand or on low speed with a dough hook until butter is melted and sugar dissolved.
4.  Stir in remaining 1/2 cup water, the yeast mixture, the egg and salt.
5.  Stir in 3 cups of the flour mixture until combined.
6.  Gradually add in the remaining flour a little at a time until dough holds together and loses some of its stickiness.
7.  Turn out onto a floured surface and knead in more bread flour as necessary until smooth and elastic.
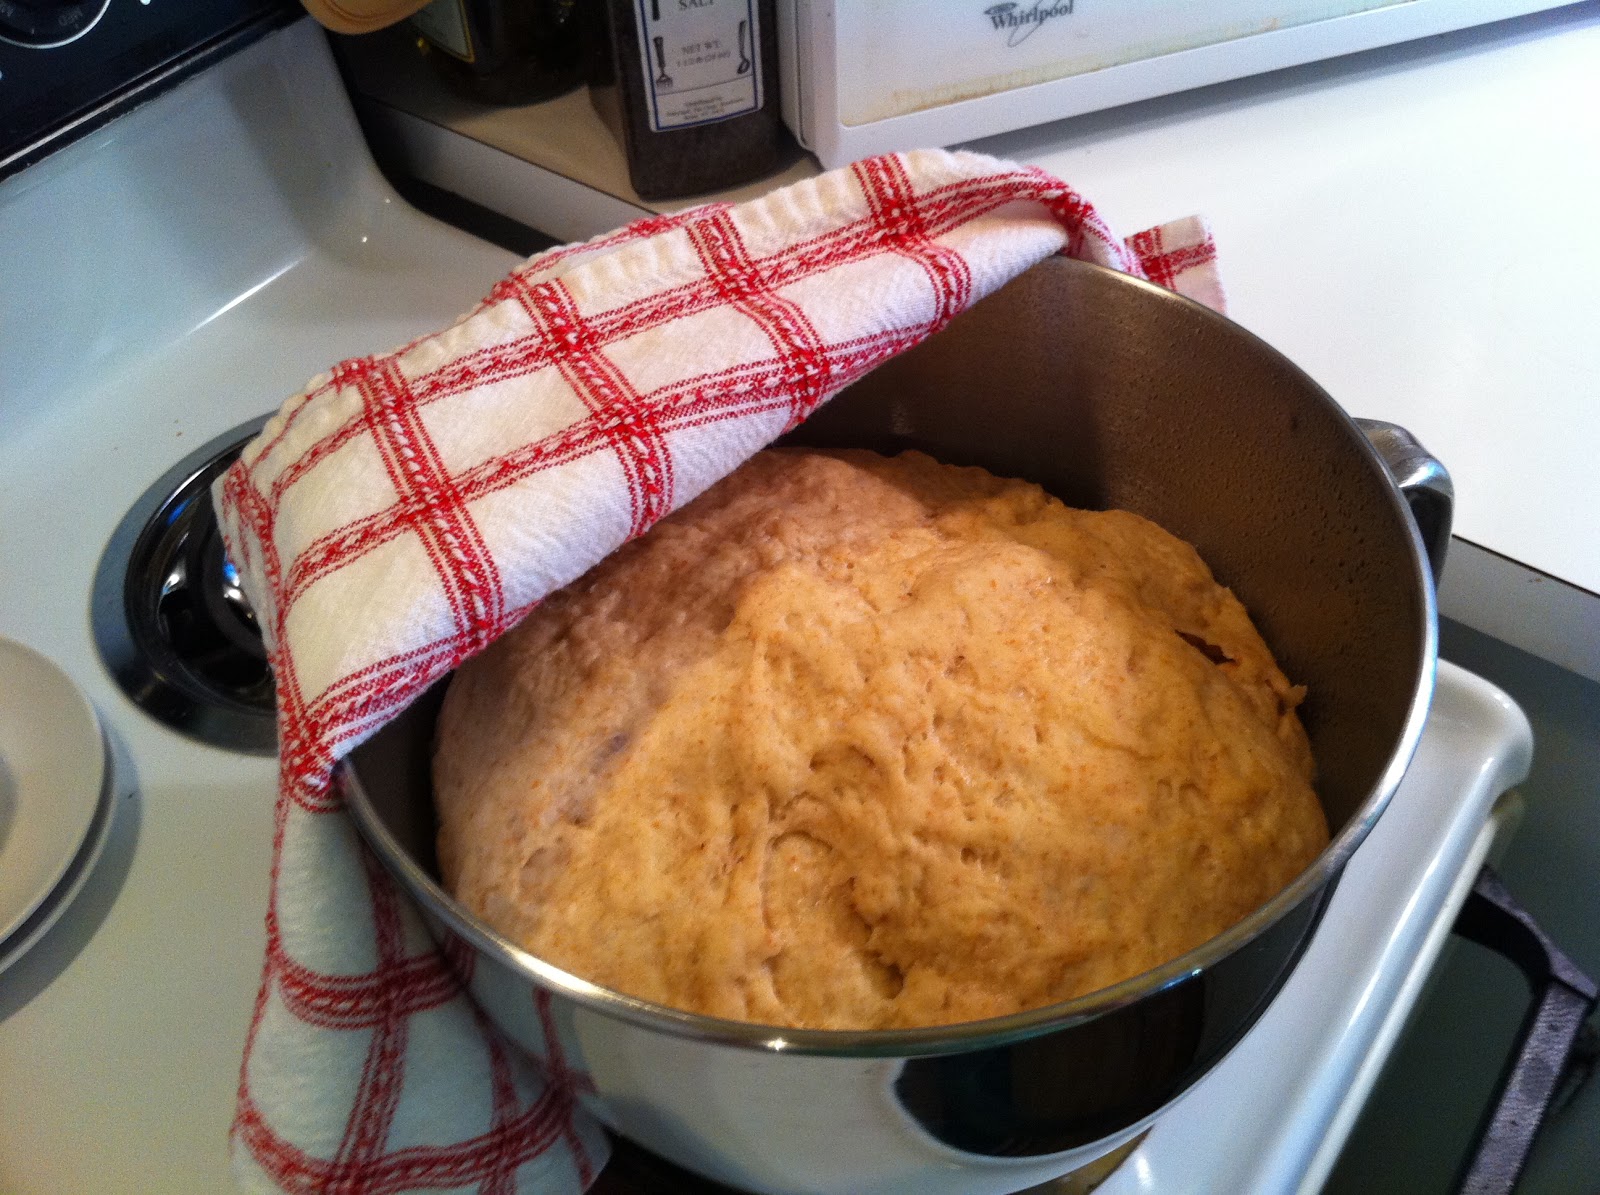
8.  Place in a greased or buttered bowl and cover with a damp towel or plastic wrap.  Let rise in a warm place until doubled, about 2 hours.
To make the filling:
1.  In a medium bowl, mix together the brown sugar, flour and cinnamon.
2.  Stir in the butter. (I use a fork.)  The sugar mixture will be the consistency of frosting.

Assembling the rolls and preparing for baking:
1.  Turn out the risen dough onto a smooth floured surface and pat or roll into a large rectangle, about 12 X 22 inches using more flour as necessary to keep dough from sticking.
2.  Using a flat blade or offset spatula, spread the dough with the cinnamon mixture.
3.  Cut into 12 1-inch wide strips starting at the narrow end.
4.  Starting at one end of the strip, roll up, tucking the end underneath the roll.  Try to avoid stretching the dough as you roll.  You don't want to make the roll too tight, because it still has some rising to do.
Note:  If you intend to freeze the rolls, at this point place the rolls on a baking sheet covered in parchment or wax paper so that the rolls do not touch each other. Place in the freezer uncovered until frozen solid.  When completely frozen, rolls may be placed in a plastic container on layers of wax paper.   For traveling, I packed the plastic container in a cooler and covered completely with ice. The rolls were still partially frozen after 7 hours of traveling.  They can go back into the freezer at your destination or onto a baking sheet in the refrigerator for cooking the next morning as per the note in step five.   If rolls are to be cooked immediately and not frozen, proceed to step five.

5.  Place rolls 2 inches apart on a baking sheet sprayed with cooking spray.  Cover and let rise for 30 minutes to an hour.

Note:  If rolls are frozen, take from the freezer the night before you intend to cook. Place rolls on a baking sheet covered in cooking spray.  Cover lightly with plastic wrap and place in the refrigerator over night.  The next morning, take the rolls out of the refrigerator a couple of hours before you intend to bake.  Place them in a warm place, not on a cold granite or marble counter top.  I placed the baking sheet on top of a 9 X 12 glass baking dish filled with warm water.  When ready to bake, proceed with step six.
  
6.  Preheat oven to 350 degrees.  Bake rolls until lightly browned, 15-18 minutes. Remove from oven.
To make the frosting:
Mix together the cream cheese, butter, sugar, milk and vanilla until smooth.  Can be mixed ahead of time and refrigerated until needed.  When the rolls come out of the oven, cool slightly and put a large spoonful of frosting on each roll.  Come back with a knife or spatula and smooth the frosting around the top of the roll.  Can be served warm or at room temperature, but warm is certainly a tad more desirable!