Saturday, August 28, 2010

Just So You Will Know...

Just so you will know, even though my last few postings have had a healthy bent, don't be deceived.  There is still plenty of activity afoot in my Fairhope kitchen producing edibles with little nutritional value.  I just want you to be absolutely clear.

Caramel Chocolate Chunk Pecan Ice Cream
After making about 5 or 6 batches of peach ice cream, I decided to branch out and try a new flavor.  I have been convinced that the possibilities for my base recipe are endless, so I have been pondering the plethora of flavor combinations available to me. Not a chocoholic myself,  I will say that I have great respect for all of you who are.  I empathize with your enjoyment of--shall we say obsession with--all things chocolate. Some of you are aficionados of silky dark chocolate, others like a semi-sweet sliver here and there, and still others would have nothing other than a creamy milk chocolate. I will not turn those down, but given a choice, I will gravitate toward burnt sugar, i.e. caramel, any day.  Give me toffee or heath bars or pecan praline and I am happy as a pig in slop!  My favorite local ice cream purveyor, Mr. Gene's Beans, sometimes (way too rarely) has a flavor I love called Caramel Turtle Fudge.  It is actually a good thing he doesn't carry it all the time, because I am not known for my ability to withstand temptation when it comes to ice cream.  Naturally, one of the first recipe morphs I considered was a caramel ice cream melange of sorts.

One of my favorite food bloggers is The Amateur Gourmet and he has waxed poetic about a Barefoot Contessa recipe for caramel ice cream.  I read through the recipe he was featuring and noted he mentioned how soft it was when it came out of the ice cream maker, showing a picture of the results looking downright soupy.  My hunch was that I could make caramel (basically burned sugar) and mix it into the same base I use for my peach ice cream and come up with a fairly creamy frozen dessert right out of the ice cream maker.  No doubt it would be better after spending a little "time out" in the freezer, but I would put money on my chances at getting a pretty good version right out of the ice cream freezer.  Just to keep you hooked so that you will read to the end and perhaps try it yourself, it was outstanding!  Here is how it works:

Caramel Chocolate Chunk Pecan Ice Cream
1 cup buttermilk
1-1/2 tsp. (1/2 package) Knox gelatin
1 egg
1-1/4 cup sugar
1/4 cup water
3 cups cream
1 Tb. vanilla
1 3-1/2 ounce bar of chocolate
2/3 cup chopped pecans

1.  Whisk the buttermilk and gelatin together and warm on top of a double boiler or in a stainless steel bowl placed over a small saucepan until gelatin is dissolved and buttermilk is steaming.

2.  Whisk egg in a small bowl.  Mix the hot buttermilk mixture into the egg a little at a time until about half of the buttermilk is mixed into the egg.  Pour the egg mixture back into the pan with remaining buttermilk and warm until it is thickened, about 5 minutes, whisking constantly to keep the mixture smooth.  Remove from the heat.
3.  In another saucepan, mix the sugar and water and begin to heat over medium high heat and bring to a boil.  Watch this sugar mixture very carefully.  It will take up to about 7 minutes to caramelize.  It is ready when it takes on a deep amber color and that will happen quite quickly.  Remove from heat.
Not Ready

Amber and Ready
4.  Off the heat, begin to pour the cream into the caramelized sugar.  The sugar will seize up as you do this.  Don't be alarmed.  Just return to medium heat and whisk constantly until the sugar is dissolved and the cream is a lovely caramel color.
5.  Now, mix the buttermilk/egg/gelatin mixture together with the cream/sugar mixture.  Add the vanilla.

You will miss a golden opportunity
if you don't grab a spoon right now and sample!
6.  Cover with plastic wrap and refrigerate until very, very cold.  Plan ahead!  This step will take about 3 hours.  To speed the process, you can place it in the freezer for awhile.  But whisk it around often so it cools evenly and doesn't freeze around the sides.

7.  Chop chocolate into small pieces.  I used Scharffen Berger semi-sweet 62 percent chocolate.  Next time, I will probably try milk chocolate.  The ice cream and semi-sweet chocolate are both so rich, I think a milk chocolate might mellow it a bit.  But if you LOVE a darker chocolate as I do, go for it!  Do use a high quality chocolate.

8.  Toast the pecans on a baking sheet in the oven at 350 degrees until they are lightly browned.  Let cool.  Combine the chocolate and the pecans in a plastic bag and place in the freezer until ready to use.  (Don't combine these two until the pecans are completely cool or it will melt the chocolate.)

9.  When cream mixture is very cool, process in ice cream maker according to the manufacturer's directions.  When ice cream is in its last few minutes of churning, add the chocolate and pecans.

When it is done it will be very creamy and quite ready to eat as is.  As a matter of fact, I ate it just like this with a spoon right out of the container.

It will benefit from a few hours in a freezer container and be quite good for at least a week or so.  It won't last that long, though!


Thursday, August 26, 2010

More Veggies, Please

Meatless Monday has been a revelation to me.  Or perhaps not so much a revelation as a reminder--I LOVE VEGGIES!  The discipline of choosing non-meat alternatives one day a week has spilled over into the other six.  I remember now how much I truly enjoy vegetables, the taste, the texture, the variety, the versatility.  When you direct your meal planning in the direction of vegetarian alternatives for just one day, your brain more readily includes and considers these options EACH time you think about what's for supper--or for lunch--or on the restaurant menu.  Over the past 2 weeks since I dedicated myself to more meatless living, I have cooked eggplant Parmesan, grilled portobello sandwiches, pasta with chunky marinara and bread salad.  And just yesterday when dining out with a friend, I gravitated toward an eggplant-filled panini as my lunch choice.  In nary a meal did I miss the meat, nor has my significant one.  (I speak on his behalf.  At least he hasn't complained in range of my hearing. He has made lots of yum-yum noises, which is always a good sign!)

One of the tricks is to keep vegetables on hand and actually USE them before they go bad.  We all hate to feel wasteful and one of the greatest guilt inducing moments for me is when I have to clean out the vegetable bin and find myself throwing out things that should have, could have been eaten and enjoyed--if only I'd been more inventive, worked a little harder, decided to cook supper instead of accepting Paul's invitation to dine out.  It is sometimes hard being a cook with a conscience--and a budget!

Earlier this week, I made a quick stop at Hazel's Market in Daphne to stock up on some of summer's bounty.  I came out with these:


If you spy something in the bowl that doesn't quite look like it was picked from a tree or pulled from the dirt or plucked off a vine, you would be the astute one.  That is a nice chunk of hoop cheese packaged in Chickasaw, Alabama, so if it isn't completely local, at least it has cousins who are.  I couldn't pass that up!  It is the cheese of my childhood, the cheese we all ate before there were other options.  The Italians may have their Parmesan and mozzarella, but in the South, we have hoop cheese.  I didn't have a plan for it at the time, other than to make sure I ate it quickly so I wouldn't have to share.

I bought small quantities of the things that would spoil.  Just one zucchini, one yellow squash, several tomatoes (tomato sandwiches equal easy vegetarian lunches) and 3 cloves of garlic which will last in my garlic keeper nearly forever, or at least until I use them.

So, Paul is traveling and I needed dinner for one last night.  I decided on a veggie quesadilla.  If you have been reading this blog at all, you may have come to the conclusion that I can make a taco or a quesadilla out of most anything.  You would be correct.  And that is truly a way to make a quick meal that will satisfy even the picky eaters at your table.  If you have enough fillings, you can customize the meal a bit without feeling like a short-order cook.  For me last night, a tortilla filled with a smattering of hoop cheese and a heap of veggies was a healthy choice and amazingly tasty.  This is not so much a recipe I offer you today, but a meal suggestion that you can customize according to whatever may be reaching its prime in your vegetable bin.

Let me add that we have a new grill.  We've been biding our time on sub-par grills until we permanently install one in the little cottage up the street that we are renovating.  Model "C" purchased from the corporate behemoth finally rusted out.  We upgraded to a slightly better model that we hope will tide us over until we're ready to throw some serious cash at an outdoor cook space, sometime in the future when we win the lottery.  Here's the newest addition to our outdoor kitchen here in our little rental, only a slight upgrade from model "C":

Grilling is a great way to cook vegetables.  You can choose whatever vegetables you have in the food prep queue in your kitchen.  I chose these from my trip to Hazel's.


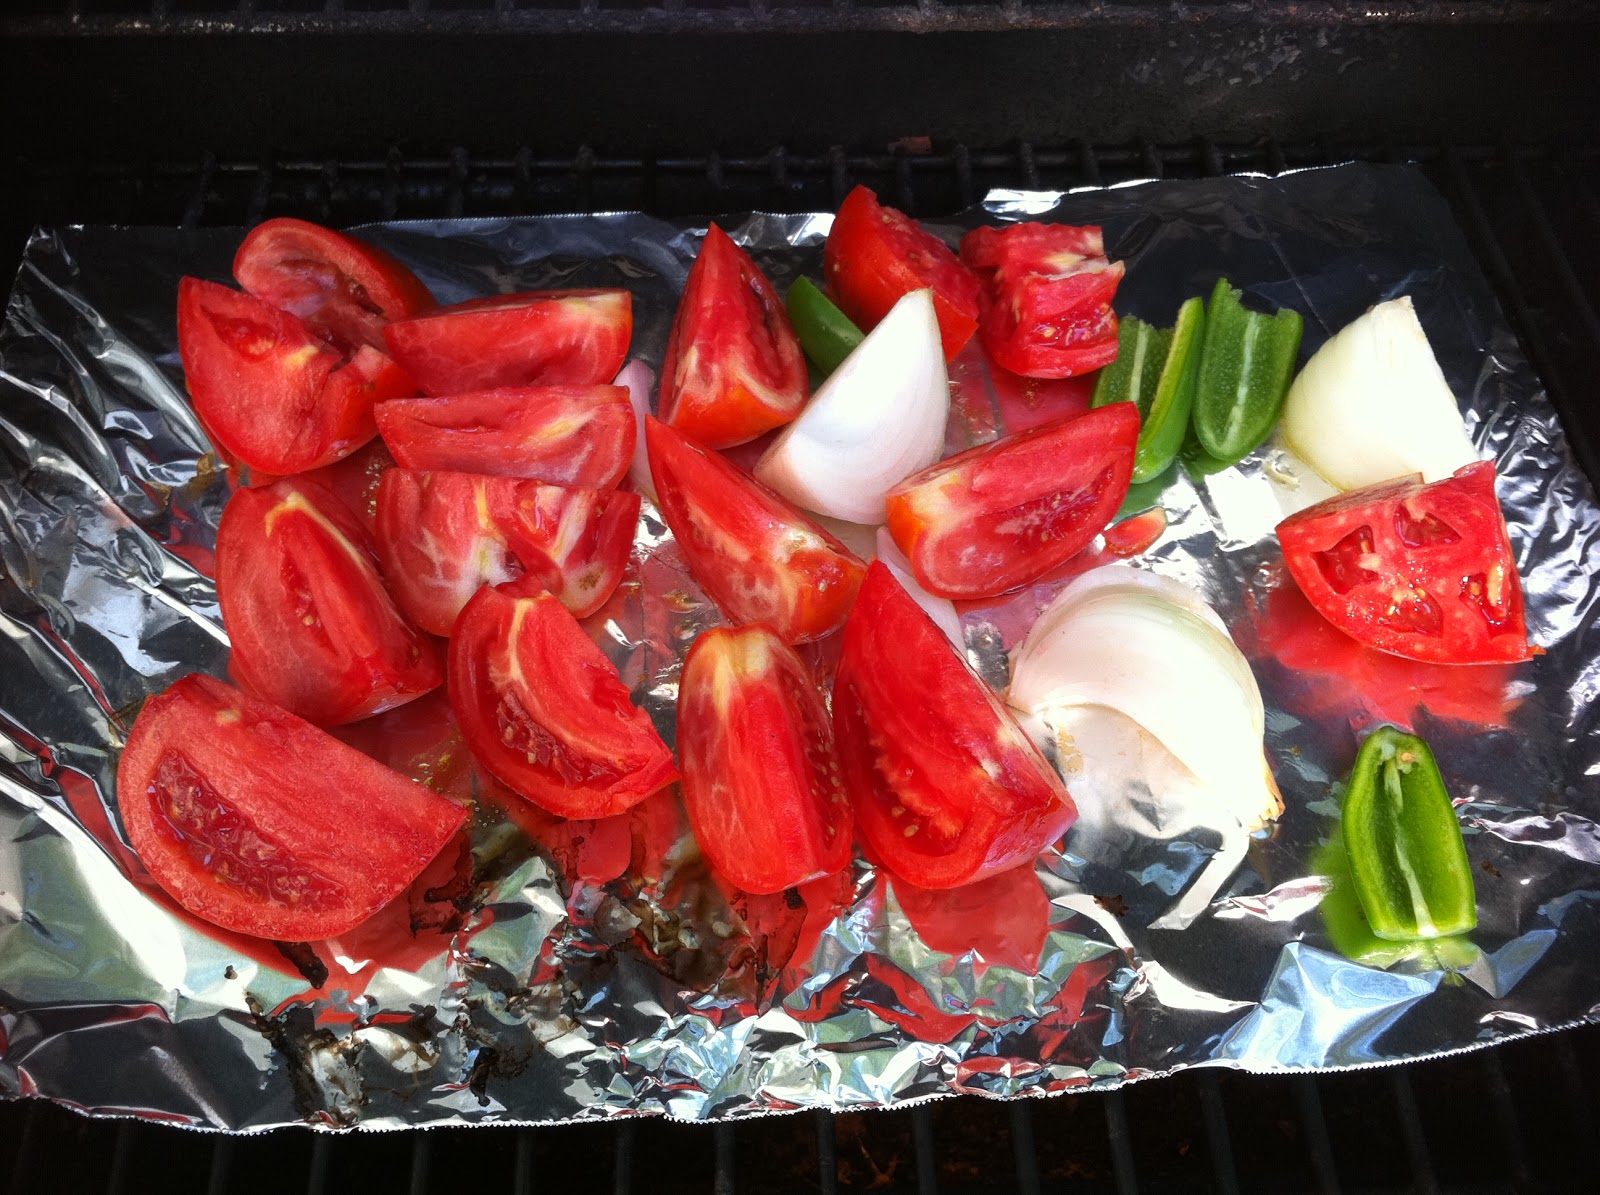
I sliced about half of the squash and zucchini, about a quarter each of the onion and tomato, and all of the little red pepper.  I use the same "technique" for a veggie quesadilla as I do for my roasted tomato salsa, spreading the veggies on a sheet of foil in a single layer directly on the grill rack after I have tossed them with a little olive oil, salt and pepper.


Here is a secret ingredient I've been using lately:


This is smoked kosher salt.  I ordered it from Amazon and it will probably last forever.  I heard two chefs  proclaim its glories as an ingredient in two separate cooking classes and decided I needed my very own supply.  This is a good addition to vegetables cooked on the grill.  Use sparingly as it can get overwhelming if you use too much.

Anyway, I digress.  Back on the grill, we have veggies hanging out on a sheet of foil getting nice and happy!  Grill them with the lid closed over medium high heat until they begin to soften and brown on one side.  At that point, use long tongs to toss them about so they can brown and char a bit all over.  Don't let them get too soft.  A little crunch adds a lot to the taste of the finished product.  When they are done, use the tongs to lift the foil by all four corners, capturing the juice with the veggies. I empty mine into a bowl so they will be easier to work with.  They will look something like this.


Now, heat a non-stick skillet over medium high heat.  Add a bit of olive oil or cooking spray.  While it is heating, grate about an ounce of cheese per person.  You don't need a lot of cheese, but the cheese becomes the glue that holds the rest of the ingredients together.


Put the tortilla in the pan and spread the cheese around on it so it can begin to melt.


When the cheese begins to soften, add your vegetables on top of the tortilla.


Since I was cooking for one, I just doubled the one tortilla over.  Because I used lots of veggies, they squished out around the sides of the tortilla.  I liked it that way.  Any veggie that escaped the tortilla just got dumped on top of the quesadilla after I removed it from the pan.  If you are feeding several people or if you are very hungry yourself, you could top this with another tortilla instead of doubling one over on itself.  I think it is a bit more manageable to flip a tortilla that is doubled over rather than two stacked together.  But I am not the boss of you in your kitchen!


Cut it into quarters (or whatever.)  Serve with sour cream, salsa, jalapeno peppers, guacamole--all your choice.  This is a most flexible way to prepare a meal.  Some broccoli would have been good in this, as would mushrooms, roasted corn or spinach.  I wouldn't put spinach on the grill, I don't think.  You could just toss the spinach into the hot veggies as they come off the grill and the heat would wilt it adequately.  You could also toss a little cilantro into the hot veggies.  Lots of possibilities here to add a few more servings of the good stuff into your diet, and not be wasteful.  If you don't have a grill, do not despair!  You can accomplish the same thing with a baking sheet lined with foil under the broiler.

So, I was the one making the yum-yum noises last night, all by myself, congratulating myself because I had eaten a home-cooked, healthy meal and made good use of things on hand.  Go check out your vegetable bin right now.  You could be feeling satisfied and pious in no time!

Wednesday, August 18, 2010

The Tomato Farmer

I suppose many women think their fathers can do anything.  The truth of the matter is, my dad really could.  He could single-handedly build a new room on a house, re-upholster furniture, hem his own pants, re-plumb or re-wire a house, change the oil or spark plugs in a car, execute a perfect swan dive from the high diving board, turn a somersault on a trampoline. Of all the things he COULD do well, perhaps the one he loved the most was farming.  Some of his happiest days, I believe, were probably the years of his retirement when he and my mother built a house on thirty acres and bought a tractor.  Every year after they moved to their new home, he cultivated a productive little garden plot growing the best tomatoes I have ever tasted.


Daddy grew up in a farming family.  He did truck farming, among other odd jobs, to put himself through college.  It is no surprise he got a degree in Agriculture from Alabama Polytechnic University, better known these days as Auburn University.  He worked in the poultry industry from the time he graduated from college until his retirement in 2000, but most summers, he cultivated a small plot of vegetables in our suburban back yard.


I remember distinctly one summer when I was a teenager, Daddy turned the whole of our yard into a garden.  When the tomatoes began to ripen in earnest, he would work his square job all day long traveling across north Georgia servicing poultry farms, only to come home in the evenings and work in the garden until dark.  My mother was in graduate school that summer and had little time to help.  My sister and I must have been pretty useless when it came to farming and canning, because I don't remember lending much of a hand in the effort.  When I think about that summer, I remember Daddy donning an apron in the kitchen and canning tomatoes.  There were so many tomatoes coming in that he turned to odd-ball recipes like homemade ketchup to help use the surplus.  Today I would probably consider his ketchup a gourmet treat.  When I was fourteen or so, I just remember thinking, "What the heck is this?"  Oh the glorious hindsight of middle age!


I sure have missed his tomatoes this summer!  There was nothing like them.  They weren't perfect.  As a matter of fact, most of them were down right ugly to look at with a craggy exterior and the occasional odd appendage.  But somehow he could grow a tomato with just the right amount of acidity and sweetness, both juicy and meaty at the same time.  The ultimate summer treat was a sandwich made with one of Daddy's tomatoes.  Just some good bread, a nice swipe of mayonnaise, a few layers of sliced tomatoes and a judicious sprinkle of salt and pepper.  Nothing better!
A couple of years ago, the weather was just right and we were still eating fresh tomatoes at Thanksgiving.  As good as they always were, Daddy was an awful critic, complaining about blossom end rot, aphids and fluctuations in the rainfall that played havoc with their growth.  But no matter how they looked on the outside, when you cut into them and caught a whiff of what was hiding within, you knew you were about to eat something special.


All this talk about tomatoes--it's just a smoke screen.  It's not the tomatoes I miss so much, it's my dad. It's just easier to talk about the tomatoes. Daddy died August 19th last year at the height of summer when the tomato harvest was in full swing.  In those days that followed, I felt closest to him every morning when I would grab a basket and help my mom gather the wealth of tomatoes hanging heavily from the vines.  There were about 15 plants thriving there, all as tall as me.  You'd think those plants would have taken a break as a courtesy of some kind, but what Daddy put in motion as he prepared the soil for planting early that spring had a momentum all its own, producing dozens each day by late August.  We finally put a table up in the garage with plastic bags available for family and neighbors to come by and take what they wanted.


I think we sometimes tend to idealize our loved ones after they are gone, making them super-human in our memories.  I sure don't want to do that or then the pressure will be on to become super-human myself and that would be an awful burden to bear.  But although, like his tomatoes, he may have had a "wart" or two, what he was to me as a father is more than I can describe.  I may be my mother's daughter, but the nut didn't fall far from the tree with my dad, either.  I learned to "measure twice and cut once" at his feet and can aptly apply that adage in most any arena of my life, becoming overly analytical and hyper-logical when a good approximation might do.  If I have confidence in my own abilities it is because Daddy gave his wife and daughters wings to reach for their dreams. And occasionally when I'm deep in concentration, I realize my tongue is sticking out just like Daddy's used to.


We've determined not to mope around this week counting what we've lost.  As a matter of fact, my mom is at church tonight leading a grief support group, helping other people walk through their own loss.  We all plan to eat tomatoes every chance we get this summer.  You'll understand, though, if in our lack of objectivity they all fall a little short of the tomatoes we remember.


I offer this recipe in memory of my dad, Gene Lambert, "the Tomato Farmer."


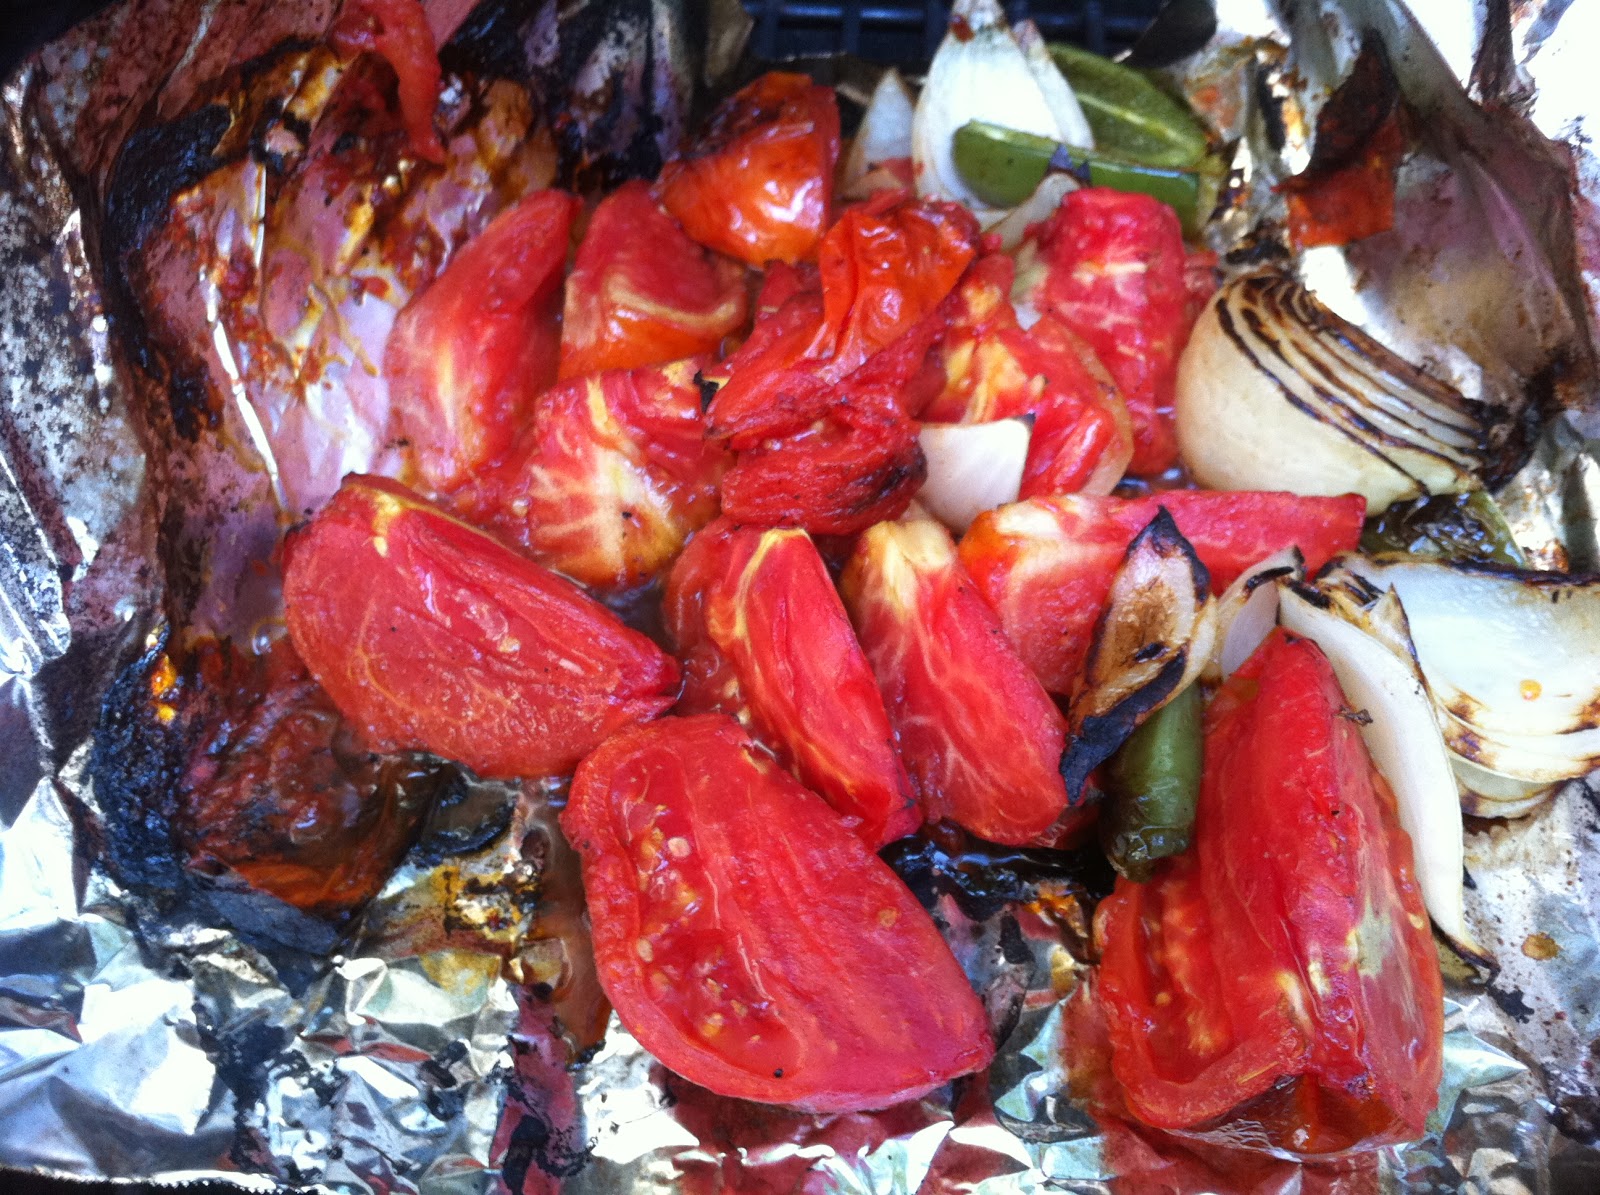
Roasted Tomato Salsa
4-5  tomatoes, the uglier the better, cut lengthwise in quarters
1 small onion, peeled and cut lengthwise into quarters
2 jalapeno peppers, cut in half lengthwise, seeds removed
olive oil
A good handful of cilantro, chopped
juice of one lime
a splash of balsamic or other vinegar
salt and pepper to taste


1.  Preheat grill to medium high.  Put a large piece of heavy duty foil over the grate.  Splash a little olive oil on the foil.  Spread the tomatoes, onion and peppers across the foil in a single layer and use tongs to roll them around in the oil a bit.
2.  Allow the tomato mixture to soften and blacken, turning occasionally with the tongs.


3.  When the tomatoes are softened and juices are bubbling on the foil, pull the foil up and together by all four corners to contain the contents with their juices.  Put foil and all into a bowl and allow to cool.
4.  When cool, dump all into a blender or food processor and puree.
5.  Add the lime juice, cilantro, salt and pepper to taste, along with just a splash of the vinegar.  Taste and correct seasoning.  Serve with tortilla chips. 


Monday, August 16, 2010

Pickling Day

I know for certain I imprinted on my mother as surely as a mallard chick imprints on Mama Duck.  I can envision how it must have happened some 50 years ago.  My dad had waited patiently for hours as I took my sweet time coming into the world.  Finally, the doctor sent him away to get some lunch, assuring him it would be awhile.  But while he was away, things began to happen rather quickly and I made my entrance.  My mom says back in 1960 they anesthetized the mother so completely she just woke up and was handed a baby, somewhat unsure of how it all came to be.  My mother may have been a little woozy when she was handed her first born daughter, but I am sure I was wide awake when they put me in her arms.  I can imagine that when I looked into her face, all the synapses fell into place.  Something must have been birthed in me at that instant that would compel me to follow her, watch her, learn from her and begin to develop an affinity for all the things she did and loved.  As soon as I was old enough to stand, my favorite place to be was on a chair beside her in the kitchen watching her cook.  Or in a chair behind her with my hands on her shoulders as she sat at the sewing machine.  I loved all her "motherly" pursuits and began to putter alongside her as soon as I was able.


Fifty years later we are still puttering side by side.  Today, it is pickling day.  I bought a big sack of cucumbers at Allegri Farm Market before I left Baldwin County, thoughts straining ahead anticipating the aroma of warm sugared vinegar spiced with cloves and allspice and cinnamon that would soon fill my mother's homey kitchen. She makes what she calls "Summer Crisps" about this time every year, a small batch recipe for refrigeration.  I simply adore eating them with sandwiches or burgers, and truth be told, I am most happy to lob them onto my plate as if they are a side dish unto themselves.  Needless to say, a quart or two won't last very long with my appetite for this sweet sour concoction.


And just as I love sweet sour pickles, Paul put in his request for a kosher dill version.  And to help things along, he found a recipe with his name on it in this month's Men's Health Magazine.  So now we have three quarts of pickles beautifully made, just waiting on a taste test.  Unfortunately, they have to mellow in the brine for awhile before we can issue our report.  The Summer Crisps are tried and true, but the dill pickles will have to be duly sampled before we can declare them a part of our regular repertoire.  Tonight, I offer these recipes and pictures for your perusal.  Check back tomorrow to hear whether or not they are an unqualified success!
Quarts 1 and 2 are Summer Crisps; on the far right are the Dill Pickles
Cucumbers in salt and ice bath
Summer Cucumber Crisps
12 pickling cucumbers or 7-8 regular cucumbers
1/1/2 Tbs. table salt
1 pint white vinegar
1-1/2 cups sugar
2 Tbs. whole cloves
2 Tbs. whole allspice
2 bay leaves
2 sticks cinnamon
2 Tbs. celery seed
1 Tbs. peppercorns
1 tsp. ground ginger


1.  Thinly slice cucumbers and put in a large bowl. Sprinkle with salt and toss with some ice.  Cover with water and allow to soak for about an hour.  Drain. 
2.  Combine all other ingredients (vinegar through ginger) in a medium saucepan.  Bring to a boil.  Cool and strain.
3.  Pack sterilized jars with cucumbers (makes about 1-1/2 quarts.)  Cover with strained marinade.  Let stand for an hour and refrigerate.  READY TO EAT!!


Note:  After an afternoon of pickling on Meatless Monday, we found ourselves starving at about 8:00 pm and loathe to heat up the kitchen again.  Served alongside egg salad sandwiches, these were perfection!


Basic Quick Dill Pickles 
6-8 pickling cucumbers, cut in quarters lengthwise
1-1/2 tsp. salt
1-1/2 cups white vinegar
3 garlic cloves, peeled and smashed
1 tbs. Kosher salt
1-1/2 Tbs. sugar
1-1/2 Tbs. pickling spice
15 peppercorns
5 sprigs dill


1.  Place cucumbers in a bowl sprinkled with salt.  Add some ice and cover with water.  Let stand for an hour and drain.  Pack cucumbers into a sterilized quart jar.  
2.  Put next 6 ingredients (vinegar through peppercorns) in a medium saucepan and bring to a boil.
3.  Pour over cucumbers.  Add dill sprigs, pushing down into jar.
5.  Let cucumbers come to room temperature and refrigerate 24 hours before serving.


Note:  I will add an update tomorrow night with a taste test report on the dill pickles.


Update:  I had one of the kosher dills after breakfast this morning.  Although not the best time to stick your hand in the pickle jar, I couldn't wait any longer to taste.  These are quite good!  Very crunchy and garlicky and dilly.  Just bought more cucumbers at the market to make another batch.

Thursday, August 12, 2010

Meatless Mondays: I Think I Can Do This!


I lived for one year as a vegetarian.  Then I met my husband and two stepsons and realized we were going to become a family.  As the four of us began to merge our lives, there were many, many accommodations we ALL had to make along the way.  Two young boys, already juggling living between two households, now had the added challenge of this crazy woman in the mix who didn't eat meat.  I had only just begun to navigate successfully for myself the waters of living meatless in a world designed for carnivores.  Now, in our new family unit, I was the lone rower trying to move us upstream when everyone else on board was flowing with the current.  I did the easy thing and caved.  It wasn't hard to do, either, because I really like meat myself.  I had committed to a vegetarian diet in an effort to eat healthier, to include more fruits, vegetables and whole grains into my diet.  I was not and am not ideologically opposed to eating meat, as long as that choice is made responsibly and from a perspective of good stewardship.  I realize now, though, that I fall into the trap of allowing the meat in my diet to displace some of the things I need so much more.  I also am beginning to understand the cumulative toll mass production of meat is taking, the harm done to the environment, the inhumane practices of industrialized livestock production, the massive amounts of water used and the fossil fuels consumed.  The impact in our own community of the recent Deep Water Horizon oil spill should awaken all of us to the need to live simpler and closer to home.
This information is from the Meatless Monday website:  "Meatless Monday is a non-profit initiative of The Monday Campaigns, in association with the Johns Hopkins’ Bloomberg School of Public Health. We provide the information and recipes you need to start each week with healthy, environmentally friendly meat-free alternatives. Our goal is to help you reduce your meat consumption by 15% in order to improve your personal health and the health of the planet.
"Presidents Wilson, Truman and Roosevelt galvanized the nation with voluntary meatless days during both world wars. Our intention is to revitalize this American tradition. We’re spearheading a broad-based, grassroots movement that spans all borders and demographic groups. By cutting out meat once a week, we can improve our health, reduce our carbon footprint and lead the world in the race to reduce climate change."


I can do this!  This is one small step I can take and I embrace the challenge of seeking out meatless alternatives that are filling and fulfilling. (If it doesn't taste good and isn't fun to prepare, I don't want it!) I am approaching Meatless Mondays from the ovo / lacto perspective, so expect to see some dairy products make an appearance in the Meatless Monday recipes I provide from time to time.  I didn't get on board the "movement" until Tuesday of this week, so I practiced with one of my favorite go-to meatless recipes for dinner that night.  Maybe you'd like to give it a whirl next Monday!


Black Bean and Goat Cheese Quesadillas
(As printed in Prevention Magazine, February 1999.  See my notes and modifications below the recipe.)


2 teaspoons vegetable oil, divided
1 small onion, chopped
1 clove garlic, minced
1 19 ounce can black beans, rinsed and drained (see note below)
1/2 cup mildly spicy bottled salsa
1/4 teaspoon ground cumin
1/2 cup crumbled goat cheese (about 4 ounces)
1/3 cup chopped cilantro
Eight 6- to 8- inch flour tortillas


1.  Heat one teaspoon of oil in a large skillet over medium heat.  Add onion and garlic and saute 3 minutes until onions are translucent and slightly soft.
2.  Add beans, salsa and cumin; cook, mashing beans slightly, until combined, about 2 minutes.
3.  Remove mixture from heat; gently stir in the goat cheese and cilantro.

4.  Place 4 tortillas on a flat surface.  Spread some bean mixture over each one; top with another tortilla.  In a large skillet, use remaining oil to cook the quesadillas one at a time until golden, about 2 minutes per side.
5.  Garnish with good stuff:  salsa, sour cream, guacamole, more cilantro, you know what to do!


Just after adding goat cheese and cilantro...

After adding cheese and cilantro--trust me, it tastes better than it looks!

Dinner for One


My preparation notes:  I've been making this recipe for a long time, and I don't think I generally find a 19 ounce can of beans in my supermarket.  The can I had in the pantry this week was 15 ounces.  That will work fine!  You may want to add slightly less salsa to keep it from being too liquid and you may only get three hearty quesadillas instead of four.  Also, I never use the whole 4 ounces of goat cheese.  Goat cheese is very tangy and goes a long way for me.  Put in about 2 ounces, and then dip your spoon in and give it a taste test.  Use your judgment.  This is a great recipe for one person.   As one whose husband travels during the week, this is a recipe I can prepare that will feed me for several meals.  Just use however much you want for one meal and refrigerate the rest.  When your significant other gets back in town, warm the leftover bean mixture in the microwave and serve with tortilla chips as a dip.  It ain't pretty, but it sure tastes good!

Tuesday, August 10, 2010

Lagniappe

Mark Twain:  "We picked up one excellent word--a word worth traveling to New Orleans to get; a nice limber, expressive, handy word--'lagniappe.' They pronounce it lanny-yap. It is Spanish--so they said. We discovered it at the head of a column of odds and ends in the Picayune, the first day; heard twenty people use it the second; inquired what it meant the third; adopted it and got facility in swinging it the fourth. It has a restricted meaning, but I think the people spread it out a little when they choose. It is the equivalent of the thirteenth roll in a 'baker's dozen.' It is something thrown in, gratis, for good measure. The custom originated in the Spanish quarter of the city. ... If the waiter in the restaurant stumbles and spills a gill of coffee down the back of your neck, he says 'For lagniappe, sah,' and gets you another cup without extra charge."
- Life on the Mississippi


Mr. Webster describes lagniappe as "a small gift given a customer for good measure at the time of a purchase," or "something given or obtained gratuitously or by way of good measure."


What an excellent word, a worthwhile concept, perhaps a precept to live by--go a little beyond what is expected, give a little more, go the second mile. 


This sounds a little like lagniappe to me:   "Love must be sincere. Hate what is evil; cling to what is good.  Be devoted to one another in brotherly love.  Honor one another above yourselves.  Never be lacking in zeal, but keep your spiritual fervor, serving the Lord.  Be joyful in hope, patient in affliction, faithful in prayer.  Share with God's people who are in need.  Practice hospitality."  Romans 12:9-13


What is lagniappe, if not hospitality?  It is the baker's dozen, the thirteenth oyster on the half shell, the neighbor who drops off some freshly picked okra, the casserole delivered to a grieving friend, the volunteer who shows up every week at the local soup kitchen, the smile and kind word for the harried check out clerk, letting someone go ahead of you in the grocery line.  It is not being too busy to care, to speak, to see beneath the surface, to ask, "How are you?" and wait for an answer.  And really listen.


Lagniappe!


And here is a little culinary lagniappe. I attended a monthly gathering of women in my neighborhood last night where we all were asked to bring a finger food.  I decided a big bowl of guacamole would be just the cool refreshment for a hot summer night.  I used to make guacamole according to the "more is more" theory.  I'd add a little of this, a dash of that, a dollop of something else, resulting in a crunchy melange of flavor containing an accent of avocado.   That was okay, until we found something better.  My husband is a willing bird dog as he mines his reading material for recipes we might enjoy trying.  It is the darnedest thing, but we have found some really stellar recipes in his Men's Health Magazines.  We found a recipe for Char Chicken Tacos (what is it with me and tacos?) with accompanying preparation instructions for an incredibly minimalist guacamole.  It has become our guacamole of choice.  It is so easy and simple, I feel guilty including it as a recipe on this blog.  You probably already have your own favorite way to make guac.  But this has become ours, so I share it today as a bit of lagniappe.  (By the way, I watched surreptitiously last night as a number of women went back for seconds, thirds and more and came home with a very empty bowl.)


Our Favorite Guacamole


one avocado, peeled and pit removed
juice of one lime
one small clove garlic, finely minced
one bunch cilantro, chopped
salt, to taste


Dice avocado and combine with other ingredients, mashing avocado only slightly so some serious chunks remain.  Serve with tortilla chips or with your favorite taco.  Be warned: fresh garlic can be sly and insidious in any recipe.  More is definitely not MORE when it comes to garlic.  When I say "small" clove here, I mean SMALL.  If you increase this recipe (and I increase it often,) do so exponentially with all ingredients except the garlic.  Taste with one clove and add more judiciously.  Last night I used three avocados, three limes and one small and one medium clove garlic.  


Here is a little lagniappe lagniappe:  Long ago, in a land very far away when I was a much younger woman, I loved to lunch at a place in Decatur, Georgia, called Rainbow Grocery.  Rainbow Grocery is still there (and wonderful,) but they no longer have the full service cafe they once had.  Back in the day, they had a lovely sandwich called the "Guacamento."  It was a sandwich prepared on whole wheat bread with a generous slick of pimento cheese topped with an equal amount of guacamole, lettuce and tomato.  It was amazing.  Some people scoff, yea, turn up their noses at the mere description of this delicacy.  But those of us in the know rave about it still and have found ways to accommodate a sometimes insatiable craving for the "Guacamento."

And finally, a last lagniappe.  Do you have one of these?


I use this fun little implement all the time.  It is the best way to juice your citrus fruits.  Buy the orange one because it can accommodate oranges, lemons and limes, not all at the same time, of course.  Here is a link in case you want your very own!

Friday, August 6, 2010

File This Under "Why Not?"

Okra, okra, okra!  Every where I look, it's all about the okra. As I retrieved the Mobile Press Register from my front yard TODAY, there featured on the front were "Pods of Glory."  Southern Living also featured okra this month.  When it comes to okra, I have successfully flown under the radar for all these years--all these many years--without EVER having cooked okra.  It's not that I don't like okra.  Well, maybe it is.  Maybe the ugly truth is I have convinced myself that in general, okra isn't my thing.  The exception is pickled okra, the kind you buy in the grocery store alongside all the other pickles.  If the jar describes the contents as "spicy" or "hot," all the better.  But the southern standard is fried okra, and quite frankly, up until this summer my attitude has been, "Why bother?"


The big problem with my laissez faire attitude is that my husband LOVES fried okra, simply loves it.  I've been able to rest comfortably on my laurels all these years because my mother, Saint Ann, makes excellent fried okra and cooks it for Paul frequently enough that I have let myself off-the-hook.  But just days ago I got busted, backed into a corner in the worst way a cook can imagine.  As Paul and I were walking into the house, our neighbor pulled up to the curb with the most generous of offers.  "Do y'all eat okra?" she queried.  Don't you love Southern hospitality?  Paul, with all the eagerness of a 3 month old Cocker Spaniel, quickly declared his love for okra right there on the spot and accepted our neighbor's gift of a sack of just picked, right out of the garden, couldn't be fresher green pods of summer.  And hands them to me with a look of raw yearning written all over his face.  Now what?  What is a good wife to do?


My first thought was to shove them in the back of the refrigerator and hope he would just forget about them.  But then, looking at those big brown puppy dog eyes, my heart softens.  It can't always be just about me in the kitchen, right?  Every now and then, I need to cook his first choice, not mine.  The stars aligned for Paul as I reviewed my menu for the evening meal to see how I might incorporate okra and thought about my plan for fish tacos.  Fried fish tacos, that is.  If I already have an egg wash, seasoned cornmeal and hot oil all set for frying fish, how hard could it be to use the same preparation to give Paul what his little heart truly desires for dinner that night.  Count me in!  Fried okra, it is.  I must say, the results were pretty good.  Paul declared me the okra-frying queen and couldn't have been happier.  If marriage works on a point system, I was flush.


But now, having jumped on the okra bandwagon with our very kind neighbor, the okra keeps on coming.  This is not a one time commitment I have made, but now must make regular appearances on the Parker menu. The article in Southern Living this month came to my rescue and gave me a lovely idea.  As I have mentioned before, anything in a taco makes me happy, so how about an okra taco?  Again, not my idea.  Blame Southern Living for this one.  As Paul was traveling out of town this week and I had a fresh batch of okra on deck in the refrigerator and a little time to play in the kitchen, I decided to give it a try.  Why not?


I decided to do my own taste test and put the Southern Living recipe alongside the one I used last week and see how the two stack up.  The article in SL this month calls for a buttermilk bath instead of an egg wash before dredging the okra in cornmeal.  With a lot of okra to play with, I set up my test kitchen with a bowl containing an egg mixed with a cup of water and another bowl filled with about a cup of buttermilk.  My usual cornmeal coating is a little spicier than the SL version, so I decided to go with the status quo there.  So I cooked the first batch dipped in the egg wash, the second in the buttermilk and then mixed some of the buttermilk and egg wash together to see if a hybrid might be the best combo.  My hunch was there wouldn't be a very big difference, but you will see, as I did, a marked difference among the three.  The preparation at the top was with the egg and water.  In the middle is the buttermilk alone and finally, at the bottom, is the combination of egg and buttermilk.  The buttermilk gave the cornmeal coating a much better chance at hanging onto the okra.  Perhaps that is why Southern cooks have been dredging chicken pieces in buttermilk for years before frying it up.  At first, I thought perhaps the oil was at a better temperature by the time I got to the buttermilk coated okra, but then when I got to the last batch and combined the egg and buttermilk, the results regressed.  Now, what about taste?  I have to be perfectly honest and tell you I couldn't detect a huge difference flavor-wise in the three. But let's be even MORE honest and declare that if you are going to fry something, the crunchier the better.  Part of the taste experience when we eat fried foods has to do with the texture, not just the flavor, and the buttermilk won on that count hands down.


For many of you, a heaping helping of fried okra alongside whatever else is on your menu may be just the thing.  But for some of you, taking it a step further and throwing a little fried okra in a taco may be too alluring to pass up.  I thought it was pretty good.  For the okra purists among you and for the taco aficionados, this is for you.  You'll know what to do!


Fried Okra Tacos (adapted from Southern Living Magazine)


1 lb. fresh okra, cut into 1/2" slices 
1 cup buttermilk
1 cup self-rising yellow cornmeal mix
1 tsp. salt
1/2 tsp. paprika
1/4 tsp. cayenne pepper
Vegetable oil


1.  Combine okra and buttermilk in a large bowl.  Combine cornmeal mix, salt, paprika and cayenne pepper in another large bowl.


2.  Heat 1 inch of oil in the pan of your choice to between 350 and 375 degrees (medium high on my electric stove.)


3.  Working in batches, remove okra from bowl with a slotted spoon.  Toss in the cornmeal mixture until well coated.  Remove from cornmeal using a slotted spoon and shake off excess.  (Can use a wire strainer for this step if your slotted spoon isn't sufficient.  All slotted spoons are not created equal!)


4.  Fry in batches about 4 minutes each, turning occasionally to brown on all sides.  Drain on layered paper towel.


For tacos:  Fill warm corn tortillas with shredded lettuce or cabbage, fried okra, shredded pepper jack cheese, guacamole, sour cream and salsa.